Garden with Insight v1.0 Help: Start the program and open a garden
Tutorial progress: |-------------------
[If you are not already running Garden with Insight, check the Quick
start section for information on starting the program.]
Look at the menu
The Garden with Insight main window is called the garden
window. It has the menu items File, Edit,
Run, Options, Window, and Help.
Open a garden file
Choose Open from the File menu. In the dialog that says
"Save current garden?", click No. Choose the file tutorial.gdn in the
directory where Garden with Insight was installed, then click OK.
Look at the tutorial garden
The tutorial garden will appear on the screen. It is a scene of a backyard garden with several raised
soil beds. [If the scene you see is blank, choose Show backdrop from the Options menu. If the scene is still blank, either the tutorial file has been
changed, or the bitmap file used by the tutorial file is missing. To choose a new backdrop picture, see How to change the backdrop picture.] You can only use one garden at a
time in Garden with Insight, so whatever garden might have been open before has been closed.
Note that you can't maximize the garden window. You can minimize the window or make it smaller, but
you can't make it any larger than the garden backdrop size or garden size inside it. You can change the
garden size (and therefore window size) by using a larger backdrop bitmap or by turning off the backdrop
and using a larger garden size (see the backdrop options window). A
larger garden size will require more memory, though.
Look at the toolbar
At the top of the window, under the menu, is a toolbar containing several items.
 The expand/collapse
button collapses the garden window to a small size or expands the garden window to full size. You
can try clicking this button now. The expand/collapse
button collapses the garden window to a small size or expands the garden window to full size. You
can try clicking this button now.
    The date
buttons move the simulation ahead one week, month, day or year. Messages will occasionally appear
in the area to the right of the date buttons. The date
buttons move the simulation ahead one week, month, day or year. Messages will occasionally appear
in the area to the right of the date buttons.
 The first drop-down list box
under the date buttons is called the tool box and holds a list of all the tools you can use. The first drop-down list box
under the date buttons is called the tool box and holds a list of all the tools you can use.
 The second drop-down list box
under the date buttons is called the actions box and holds a list of all the actions you can perform
with the tool currently selected in the tool box. The contents of the actions box will change every time you
choose a new tool from the tool box. Some tools only have one action. The second drop-down list box
under the date buttons is called the actions box and holds a list of all the actions you can perform
with the tool currently selected in the tool box. The contents of the actions box will change every time you
choose a new tool from the tool box. Some tools only have one action.

For some tools and actions, one or two additional drop-down list boxes will appear under the date buttons.
These are called the value boxes, and they list choices for the current tool action, such as depths
or amounts of material. There will probably not be any value boxes showing now.
The large area under the toolbar which has a picture of a garden in it is called the garden picture. The bar at the bottom of the garden window is called the
harvest panel; it shows the items you have harvested from the garden.
It is probably empty now.
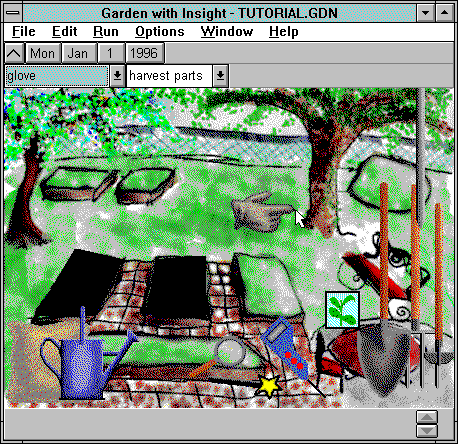
The garden window showing the tutorial garden just after opening
Tutorial index Next
| 